There’s something magical about combining creativity and culinary skills, and that’s exactly what focaccia bread art allows you to do. I remember the first time I stumbled upon a photo of beautifully designed focaccia bread on Instagram. It was so stunning that I thought it was too complicated for an amateur like me. But after a bit of experimenting and following some easy techniques, I realized that anyone, even beginners, can master this art! In this guide, I’ll take you step-by-step into the world of focaccia bread art, covering everything from making the perfect dough to designing intricate patterns that wow your guests.
What Is Focaccia Bread Art?
What Makes Focaccia Bread Art Unique?
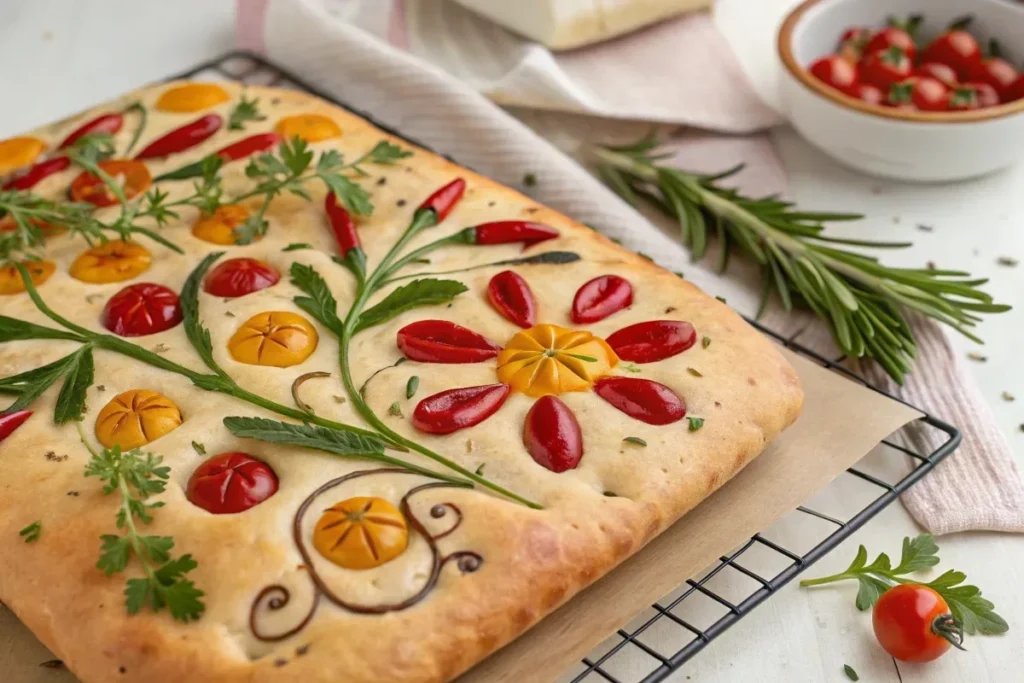
Focaccia bread art takes an ordinary Italian bread and turns it into a blank canvas for edible creativity. This trend has surged in popularity, thanks to its combination of artistry and deliciousness. Unlike traditional focaccia, where the focus is primarily on flavor, focaccia bread art involves arranging vibrant vegetables, herbs, and sometimes edible flowers to create intricate designs. Think of it as painting with ingredients!
What makes it unique is how it combines the visual appeal of food with the comforting, rustic flavor of fresh-baked focaccia. It’s an art form that’s as delightful to look at as it is to eat. Plus, it’s an excellent way to get creative in the kitchen, whether you’re baking for fun or preparing for a special event.
A Brief History of Focaccia Bread and Its Evolution Into Art
The origins of focaccia bread date back to ancient Rome, where it was a staple baked on hot stones. Traditionally flavored with olive oil, herbs, and salt, focaccia quickly became an iconic Italian bread. Its simplicity made it versatile, and over time, people began experimenting with toppings.
The modern trend of focaccia bread art can be traced back to a surge in home baking during the pandemic. With people spending more time indoors, they started looking for ways to add a creative touch to everyday recipes. Inspired by the beauty of nature and fueled by social media platforms like Instagram and Pinterest, focaccia bread art transformed from a niche idea into a global sensation.
Whether you’re a seasoned baker or a curious beginner, this art form invites you to explore endless possibilities and make something truly your own.
Find new ways to make your dishes creative:
Mac and Cheese Meatloaf Casserole
Ingredients and Tools You’ll Need for Focaccia Bread Art
Essential Ingredients for a Perfect Focaccia Base
Creating the perfect focaccia bread art begins with a well-prepared dough. Here’s what you’ll need for the base:
- Flour: Opt for all-purpose or bread flour for a light and fluffy texture. If you prefer a rustic touch, mix in a portion of whole wheat flour.
- Yeast: Instant or active dry yeast works well for focaccia. Be sure to activate it if you’re using active dry yeast.
- Warm Water: Essential for activating the yeast and hydrating the dough.
- Olive Oil: High-quality extra virgin olive oil enhances both the flavor and texture.
- Salt: Fine sea salt is perfect for seasoning the dough.
- Sugar or Honey: A small amount helps feed the yeast and adds a subtle hint of sweetness.
Decorative Elements: Vegetables, Herbs, and Edible Flowers
The “art” in focaccia bread art comes from the toppings! Here are some ideas for vibrant decorations:
- Vegetables: Thinly sliced bell peppers, cherry tomatoes, red onions, zucchini, or asparagus create colorful designs.
- Herbs: Fresh rosemary, thyme, parsley, and dill add greenery and aromatic flavors.
- Edible Flowers: Nasturtiums, pansies, and marigolds offer a stunning touch of elegance.
- Other Options: Sliced olives, capers, or even shredded cheese for texture and color.
Pro Tip: Slice vegetables thinly to ensure even baking, and choose fresh ingredients for the best results.
Tools to Elevate Your Focaccia Art Game
While focaccia art doesn’t require fancy equipment, a few tools can make the process smoother:
- Baking Sheet or Pan: A rectangular or round pan works best for focaccia.
- Sharp Knife or Kitchen Scissors: For precise slicing of vegetables and herbs.
- Pastry Brush: Ideal for applying olive oil evenly over the dough and toppings.
- Rolling Pin: Useful for evenly spreading the dough if needed.
- Parchment Paper: Prevents sticking and makes cleanup a breeze.
Now that you have your ingredients and tools ready, you’re all set to start crafting your masterpiece.
Step-by-Step Guide to Making the Perfect Focaccia Dough
Choosing the Right Flour and Yeast
The foundation of any great focaccia bread art starts with a well-made dough. To achieve the ideal texture—crispy on the outside and soft on the inside—you’ll need the right ingredients:
- Flour: All-purpose flour works perfectly, but if you’re aiming for a more elastic dough with a slight chew, opt for bread flour. For a rustic touch, you can mix in whole wheat or spelt flour (up to 20% of the total amount).
- Yeast: Both instant yeast and active dry yeast are suitable. If you’re using active dry yeast, dissolve it in warm water (100–110°F) with a pinch of sugar for 5–10 minutes until it’s foamy.
Kneading Techniques for Beginners and Experts
Proper kneading is crucial for developing gluten, which gives the dough structure and strength. Follow these steps:
- Mix the Ingredients: In a large bowl, combine flour, yeast, warm water, olive oil, salt, and a pinch of sugar. Stir until the mixture comes together.
- Knead the Dough: Turn the dough onto a lightly floured surface. Using the heel of your hand, push the dough forward, then fold it back. Rotate and repeat for about 8–10 minutes.
- Soft and Elastic Dough: When ready, the dough should feel smooth, elastic, and slightly tacky to the touch. If it’s too sticky, sprinkle in a bit more flour.
If you have a stand mixer, use the dough hook attachment on medium speed for 5–7 minutes.
The Secret to Proper Dough Fermentation and Resting Time
Fermentation is where the magic happens. Follow these tips for a perfectly proofed dough:
- First Rise: Place the kneaded dough into a lightly oiled bowl. Cover it with plastic wrap or a damp towel and let it rise for 1–2 hours in a warm place until it doubles in size.
- Degas the Dough: Gently punch the dough down to release trapped air bubbles. This step ensures an even texture.
- Second Rise (Optional): For even more flavor and structure, let the dough rest for an additional 30–60 minutes after shaping it into the baking pan.
- Resting in the Pan: Spread the dough into your baking sheet or pan, dimpling the surface with your fingers to create texture. Let it rest for 20–30 minutes before adding your toppings.
With a properly proofed dough, you’re ready to move on to the most exciting part—designing your focaccia bread art!
Designing Your Focaccia Bread Art: Tips and Tricks
How to Plan Your Design: Sketching Ideas on Paper
Before you start decorating your focaccia bread, it’s helpful to have a plan in mind. While free-styling can be fun, sketching a rough design on paper allows you to visualize the layout and choose the best placement for each ingredient.
- Choose a Theme: Consider themes like nature, seasons, or specific occasions. For example:
- Nature: Flowers, trees, and landscapes.
- Seasons: Fall leaves, spring blossoms, or winter wreaths.
- Occasions: Birthday messages or holiday greetings.
- Divide the Canvas: Treat your focaccia dough as a blank canvas. Divide it into sections if you plan to use different colors or textures.
- Test Your Design: Place your toppings on a cutting board first to check your composition before applying them to the dough.
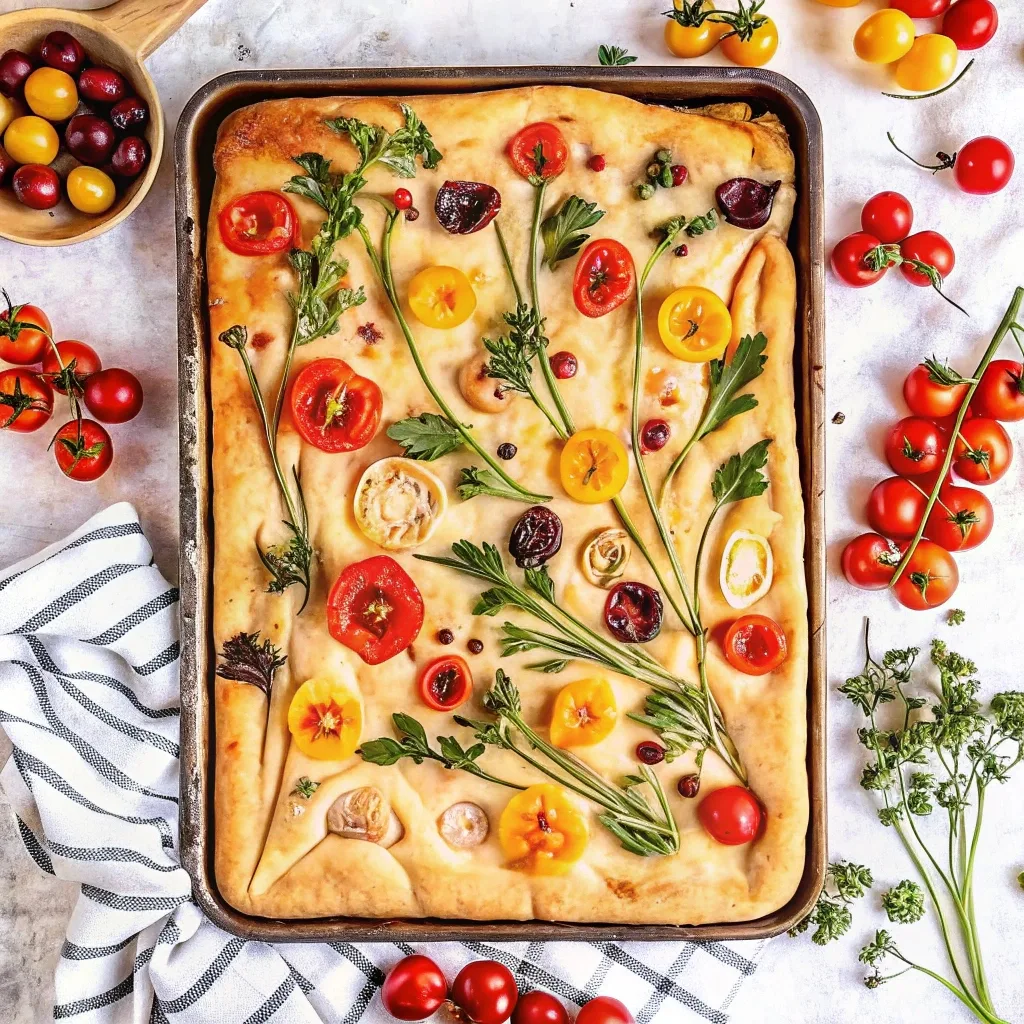
Arranging Vegetables and Herbs for Maximum Visual Impact
Now comes the fun part—creating your edible masterpiece! Here are tips for placing toppings:
- Balance Colors: Use a mix of bright and earthy tones. For example:
- Bright Colors: Red cherry tomatoes, yellow bell peppers.
- Earthy Colors: Sliced onions, zucchini, or asparagus.
- Layering: Start with the larger items (e.g., tomato slices or flower shapes) as your focal points, and layer smaller items like herbs or capers for detail.
- Spacing: Leave some negative space on the dough so your design doesn’t look overcrowded. The focaccia itself adds a golden, rustic charm that should be part of the art.
- Press Lightly: Gently press toppings into the dough to ensure they stay in place during baking but don’t sink too deep.
Tips for Balancing Aesthetics with Flavor
It’s not just about looking good—your focaccia art should taste amazing, too! Here’s how to balance art with flavor:
- Use Ingredients You Love to Eat: Choose toppings that complement the flavor of the focaccia, like olives, sun-dried tomatoes, or garlic slices.
- Avoid Overloading the Dough: Too many toppings can make the bread soggy or prevent it from baking evenly.
- Incorporate Herbs for Aroma: Fresh herbs like rosemary, thyme, and parsley add a burst of flavor and a fragrant aroma to the bread.
- Brush with Olive Oil: After arranging your toppings, lightly brush them with olive oil to prevent burning and to enhance their color during baking.
Baking and Finishing Touches for Focaccia Bread Art
Preparing the Dough for Baking Without Smudging Your Art
After designing your focaccia bread art, the last thing you want is for your masterpiece to smudge or fall apart before baking. Here’s how to prepare it for the oven without disrupting your design:
- Dimple the Dough: Once the dough has rested in the pan, press it gently with your fingertips to create dimples across the surface. This helps hold the olive oil and toppings in place.
- Secure the Toppings: Press your vegetables, herbs, and other decorations lightly but firmly into the dough so they adhere properly without sinking.
- Brush with Olive Oil: Use a pastry brush to coat the entire surface with a thin layer of olive oil. This step ensures the toppings stay moist during baking and develop a beautiful, golden sheen.
- Sprinkle with Salt: A pinch of flaky sea salt over the surface enhances both the flavor and appearance.
Using Olive Oil for That Golden Glow
Olive oil is the unsung hero of focaccia bread art, adding flavor and texture while helping the toppings bake evenly. Here’s how to get the most out of it:
- Before Baking: Generously brush olive oil on both the dough and the decorations to keep them from drying out or burning.
- During Baking: Check the bread halfway through baking, and if it looks dry, add a light drizzle of olive oil for extra moisture.
- After Baking: A final drizzle of olive oil over the freshly baked focaccia adds richness and enhances the flavor of the toppings.
Post-Baking Tips: Adding Fresh Garnishes or Seasonings
Once your focaccia comes out of the oven, it’s time to add the finishing touches:
- Fresh Herbs: Sprinkle fresh herbs like parsley or dill to brighten up the design and add a fresh aroma.
- Grated Parmesan or Pecorino: For extra indulgence, grate a little cheese over the top while the bread is still warm.
- Optional Glaze: For a glossy finish, lightly brush the decorations with more olive oil after baking.
Common Mistakes to Avoid When Making Focaccia Bread Art
Overloading the Bread with Toppings
One of the most common mistakes when creating focaccia bread art is adding too many toppings. While it’s tempting to include as many ingredients as possible, overloading the dough can lead to several issues:
- Soggy Bread: Excess toppings can release water during baking, making the bread soggy instead of fluffy.
- Uneven Baking: Too many layers of vegetables or herbs might prevent the dough underneath from baking evenly.
- Overpowering Flavors: Instead of complementing each other, too many flavors can clash or mask the bread’s natural taste.
Pro Tip: Less is more. Focus on a balanced design with just a few vibrant colors and flavors.
Not Proofing the Dough Properly
Skipping or rushing the proofing stage can ruin the texture and flavor of your focaccia. Under-proofed dough can result in dense, chewy bread that doesn’t rise properly in the oven. On the other hand, over-proofed dough may collapse during baking.
Avoid This By:
- Allowing the dough to double in size during the first proofing (about 1–2 hours).
- Letting the dough rest for an additional 20–30 minutes after shaping it in the pan to allow the gluten to relax.
Using Non-Edible Decorations or Unbalanced Colors
While focaccia bread art is all about creativity, it’s crucial to use only edible ingredients. Avoid using items like plastic picks, inedible flowers, or artificial colors that could make the bread unsafe to eat.
Tips for Success:
- Stick to Edible Ingredients: Choose fresh vegetables, herbs, and edible flowers.
- Think About Contrast: Use a mix of bright and muted colors to make your design visually appealing without overdoing it.
- Be Mindful of Baking Time: Delicate items like herbs and thinly sliced vegetables can burn easily, so place them strategically or brush them with extra olive oil for protection.
Creative Focaccia Art Ideas for Inspiration
Seasonal Themes: Spring Blossoms, Autumn Leaves, and Winter Scenes
Using the seasons as your inspiration is a great way to design stunning and relevant focaccia bread art. Here are some seasonal ideas:
- Spring Blossoms: Use thinly sliced radishes, cherry tomatoes, and asparagus tips to create flowers. Fresh herbs like dill or parsley can be used as stems and leaves.
- Summer Vibes: Think of a garden bursting with life—use yellow and red bell peppers for sunflowers and blueberries for a pop of unexpected color.
- Autumn Leaves: Slice red, orange, and yellow bell peppers into leaf shapes. Sprinkle rosemary sprigs to represent bare branches.
- Winter Scenes: Use white onions or thinly sliced potatoes for snowy landscapes. Create a wreath by arranging herbs like rosemary and thyme in a circular shape.
Animal and Nature-Themed Designs
Bring animals and landscapes to life on your focaccia canvas! Here are some creative ideas to try:
- Birds in a Garden: Use olives for the bird’s body and red pepper slices for beaks. Herb sprigs can serve as perches or trees.
- Under the Sea: Use asparagus spears as seaweed and cherry tomato slices as fish. Add sesame seeds for a sandy effect.
- Sunrise or Sunset: Layer thin slices of orange and yellow bell peppers to create a sun, and use herbs for the horizon line.
Pro Tip: Use cookie cutters for precision when cutting vegetables into fun shapes!
Personalized Focaccia Art for Special Occasions
Focaccia bread art is perfect for birthdays, holidays, and even weddings. Personalize your designs to make them extra special:
- Birthdays: Write names or numbers using strips of bell peppers or olives. Add flower patterns with sliced vegetables for a festive touch.
- Holidays: Create Christmas trees with rosemary sprigs, ornaments with cherry tomatoes, or a heart design for Valentine’s Day.
- Weddings: Use delicate edible flowers and herbs to create elegant floral arrangements that match the event’s theme.
Tips for Creating Your Own Unique Designs
- Experiment with Colors and Textures: Mix soft vegetables (like tomatoes) with crisp ones (like carrots) to add dimension.
- Add a Personal Touch: Incorporate symbols, patterns, or designs that hold personal meaning, like family initials or favorite colors.
- Gather Inspiration: Browse platforms like Instagram and Pinterest for new ideas and adapt them to your style.
Health Benefits of Focaccia Bread Art Ingredients

Nutritional Value of Whole-Grain Focaccia
Focaccia bread is not only a treat for the eyes but can also be a healthy addition to your diet, especially when made with whole-grain flour. Here’s why:
- Rich in Fiber: Whole-grain flour contains more fiber than refined flour, which aids digestion and keeps you full for longer.
- Essential Nutrients: Whole grains are packed with vitamins and minerals like magnesium, iron, and B vitamins.
- Energy Boosting: The complex carbohydrates in whole grains provide a steady release of energy, making it a great option for a midday snack.
If you want to make your focaccia bread art healthier, replace up to 50% of the all-purpose flour with whole-grain flour for added nutrition and a slightly nutty flavor.
Health Benefits of Using Fresh Herbs
Fresh herbs aren’t just a beautiful addition to your focaccia bread art—they also pack a punch of health benefits!
- Rosemary: Known for its anti-inflammatory properties, rosemary may improve memory and digestion.
- Thyme: Rich in antioxidants, thyme supports the immune system and helps fight off colds.
- Parsley: High in vitamin K, parsley promotes bone health and aids in blood clotting.
- Dill: A great source of vitamin C and calcium, dill is beneficial for skin health and bone strength.
Pro Tip: Use herbs liberally to boost both the flavor and nutritional profile of your bread.
Adding Veggies for Extra Nutritional Value
The vegetables used to create stunning designs on focaccia bread also bring a wealth of nutrients to the table:
- Bell Peppers: Loaded with vitamin C and antioxidants, bell peppers support immune health and combat free radicals.
- Cherry Tomatoes: A great source of lycopene, tomatoes are known for their heart-health benefits.
- Onions: Contain compounds that support heart health and reduce inflammation.
- Zucchini: Low in calories but rich in vitamins A and C, zucchini adds a healthy touch to your bread.
Explore this recipe:
Chunky Chicken Noodle Soup
FAQs
What is special about focaccia bread?
Focaccia bread stands out for its unique texture and flavor. It’s known for its crispy, golden crust and soft, airy interior, achieved through proper proofing and the generous use of olive oil. Unlike other breads, focaccia serves as a versatile canvas for both savory and sweet toppings. Its ability to be transformed into edible art makes it even more special. Beyond aesthetics, focaccia’s subtle flavor pairs beautifully with a variety of dishes or stands alone as a delightful snack.
How to keep focaccia art from burning?
Burnt decorations can ruin the look and taste of your focaccia bread art. To prevent this:
- Use Olive Oil: Brush your toppings generously with olive oil before baking to keep them moist and prevent scorching.
- Cut Thin but Not Too Thin: Slice vegetables evenly—thin enough to cook through but not so thin that they burn quickly.
- Monitor Baking Time: Bake at 400°F (200°C) for 20–25 minutes, checking periodically to ensure your toppings stay vibrant but don’t overcook.
- Add Delicate Items Later: Items like herbs or thinly sliced garlic can be added halfway through baking to avoid burning.
What is the secret to great focaccia?
The secret to great focaccia lies in three key factors:
- High-Quality Ingredients: Use extra virgin olive oil, fresh herbs, and good flour to elevate the flavor.
- Proper Proofing: Allow the dough to rise sufficiently during the first and second proofs. This creates the characteristic airy texture.
- Generous Olive Oil Use: Olive oil gives focaccia its signature crisp crust and rich flavor. Be liberal when applying it to both the dough and pan.
What is the cultural significance of focaccia?
Focaccia has deep cultural roots, particularly in Italy. It dates back to Roman times and was originally baked on hot stones. In Italian culture, focaccia is considered a symbol of community and celebration, often shared at gatherings or religious festivals. Regional variations, like Ligurian focaccia, highlight the bread’s local significance. Today, it represents not only a culinary tradition but also a creative outlet for food art.
Conclusion
Focaccia bread art is more than just a baking trend—it’s a creative journey that allows you to combine culinary skills with artistic expression. Whether you’re a seasoned baker or a beginner, making focaccia bread art is an accessible and enjoyable experience that lets you craft edible masterpieces with simple ingredients.
The beauty of focaccia bread art lies in its versatility. From using vibrant vegetables and fragrant herbs to designing intricate patterns inspired by nature or special occasions, the possibilities are endless. Along the way, you’re not only creating something stunning to look at but also producing a delicious bread that can be shared with family and friends.
For beginners, the key is to start small and experiment. Master the basics of dough preparation, practice with simple designs, and gradually explore more complex patterns. The process is as rewarding as the final product, and every focaccia you bake is an opportunity to showcase your creativity.
So, gather your ingredients, let your imagination run wild, and create a focaccia bread art masterpiece that’s as delightful to eat as it is to admire. Remember, the best part about focaccia bread art is that there’s no right or wrong—it’s your edible canvas!
1 thought on “The Best Focaccia Bread Art Guide: Creative & Stunning Designs”